Please note we will be closed from 24th December for the break.
We will be open again from 5th January 2026 and look forward to assisting you in the new year!

Categories
Articles

10+ Wall Mounted Clothing Rack Designs

10+ Clothing Rack Solutions Using KeeKlamp

The article is used with permission from Simplified Building UK
https://simplifiedbuilding.co.uk/projects/wall-mounted-clothing-rack-ideas

When it comes to creating stylish yet practical storage, wall mounted clothes rail ideas are a fantastic way to organise and display garments. Perfect for both retail settings and personal spaces, these racks combine functions with design flair. A wall mount clothing rack not only saves space but also creates a clean, accessible layout that makes browsing or daily use effortless.

Because clothing rails and garment rails can be mounted directly to the wall, they provide added stability while maximising floor space. From industrial-inspired displays to minimalist storage, the options are highly versatile. Below, we’ve pulled together over 10 inspiring clothing rack ideas to spark your next project.

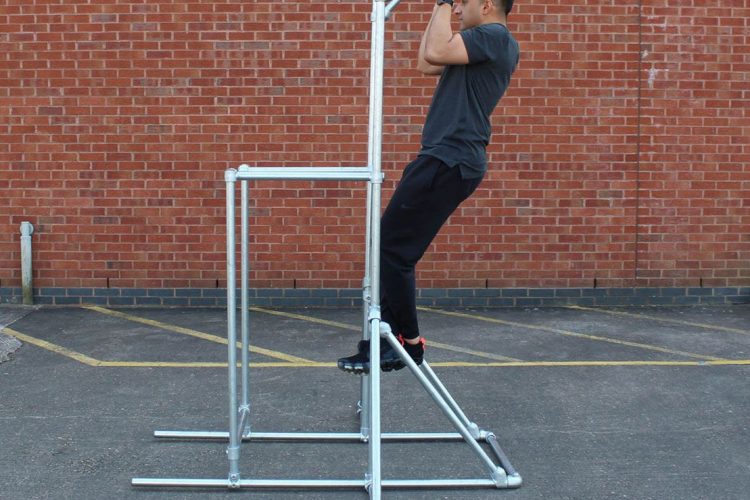
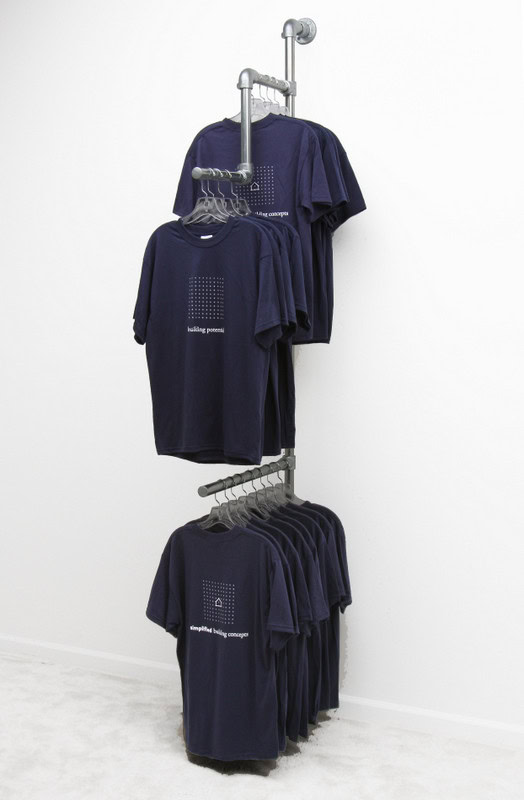
Double Wall Mounted Clothing Rack

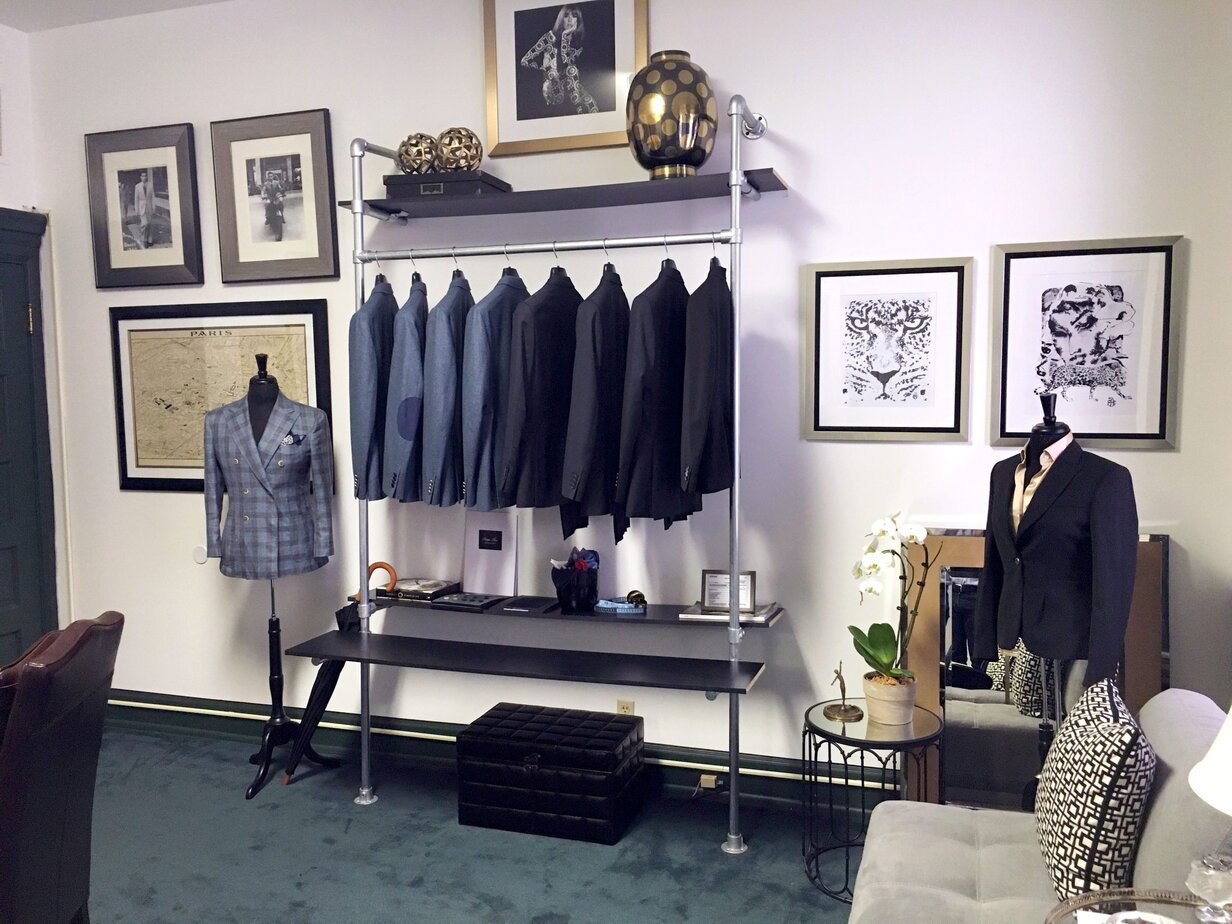
This sturdy design combines strength and practicality. Mounted to both the wall and the floor, it’s ideal for heavy garments such as coats, jackets, or suits. By integrating shelving into the structure, this wall-mounted clothing rail provides dual functionality: hanging space above and shelving below. This makes it particularly useful for shops that need to display both hanging and folded stock, or for home wardrobes where accessories and shoes need a dedicated place. The reinforced design ensures long-term durability, even under frequent use.

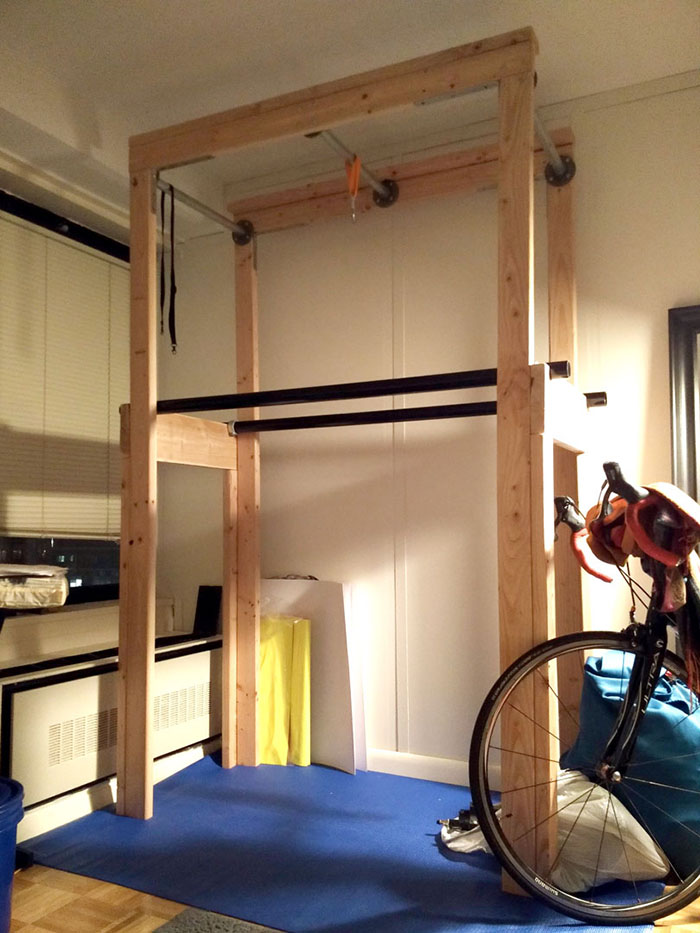
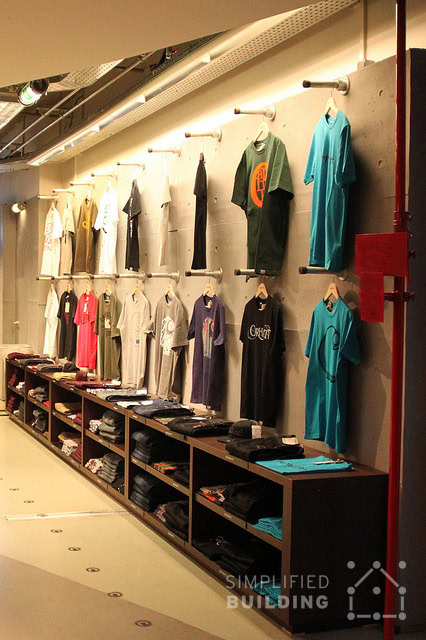
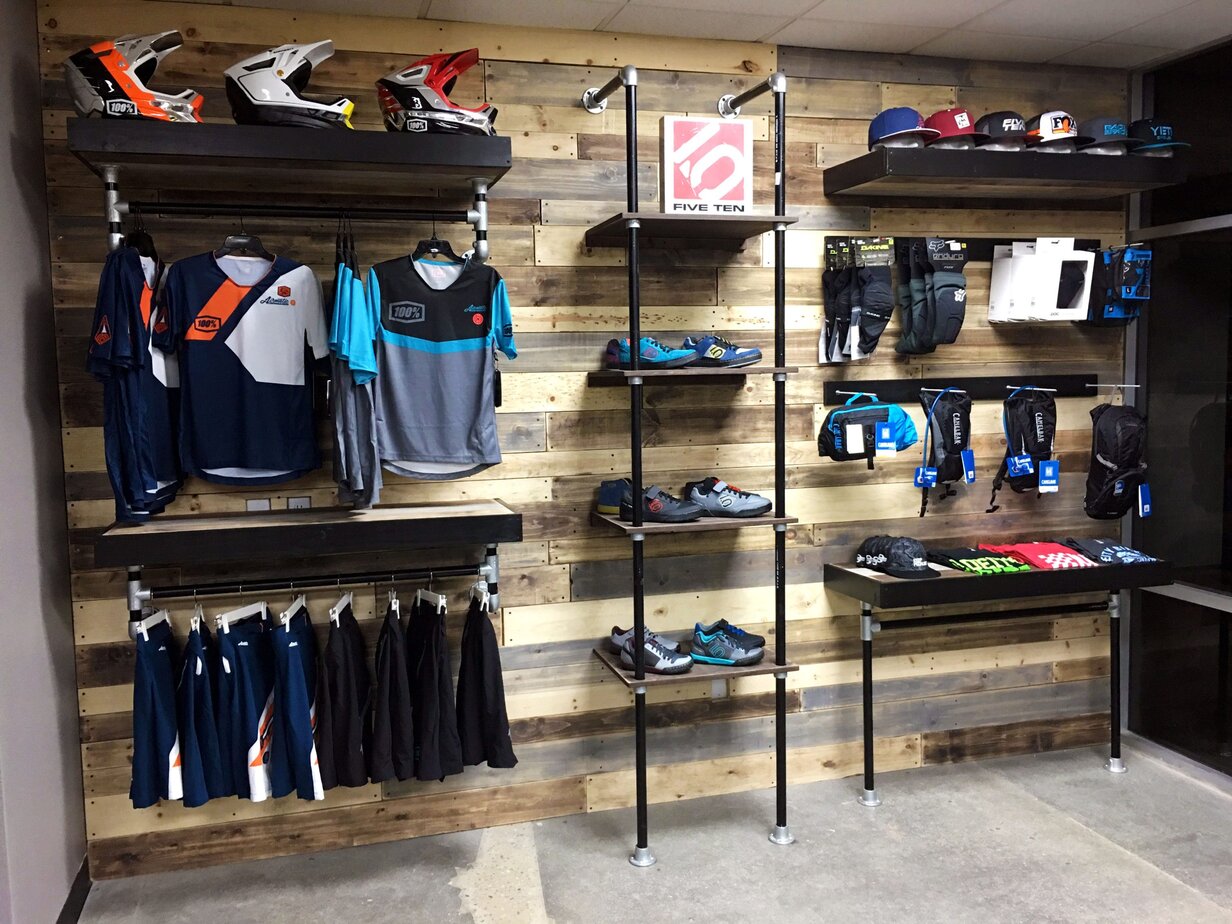
Multi-Level Wall Mounted Clothing Rack

For a dynamic and visually appealing display, a multi-level layout is an excellent option. This design uses staggered rails at varying heights, creating a layered look that allows clothing to be grouped by type or length. Retailers benefit from the extra visual impact, while at home it’s a smart way to separate casual wear, formalwear, and outerwear. Built with modular tube and fittings, these garment rails can be customised to suit your wall size, making them as practical as they are stylish.

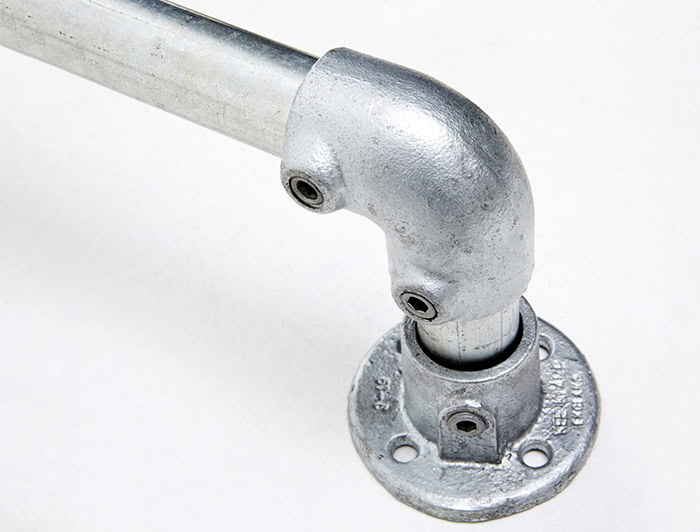
Single Face-Out Bars

Minimalist and space-saving, single face-out bars extend directly from the wall to highlight individual garments. They’re perfect for showcasing best-sellers, promotional items, or special pieces in a retail environment. At home, they’re great for setting out outfits for the week or displaying favourite clothing items. Available in different lengths, they can be arranged in creative patterns or rows to form unique wall displays, making them one of the simplest yet most versatile clothing rack ideas.

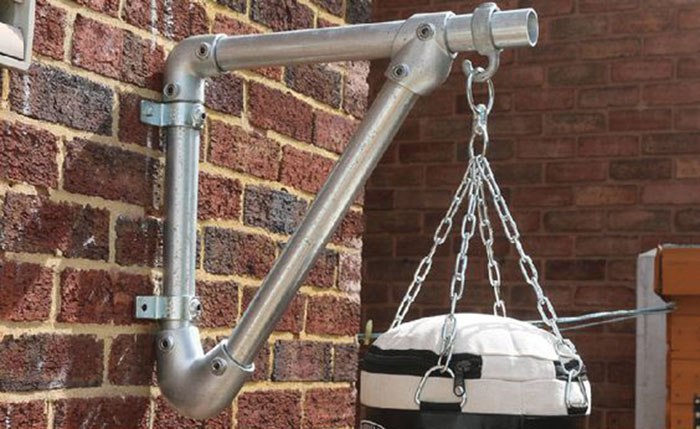
Mounted Hanging Bars

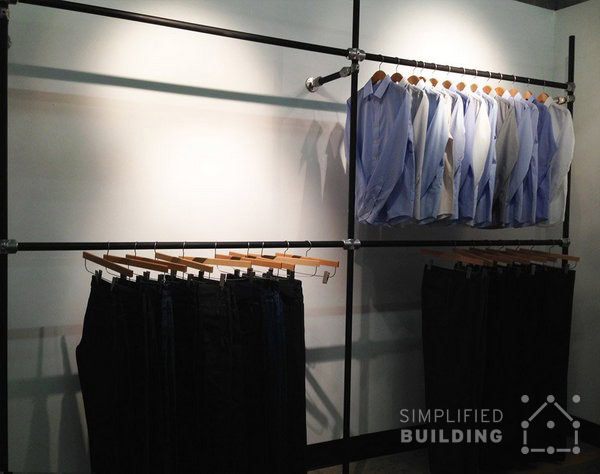
A sleek modern choice, mounted hanging bars create defined sections for clothing organisation. Made from painted tubing with a premium finish, these clothing rails bring a polished high-end look to both retail stores and home closets. They’re ideal for creating an open-plan wardrobe or stylish retail section where clothing is clearly divided by type. Because the bars are wall-mounted, the design maximises available space while keeping floors clear for baskets, boxes, or additional storage.

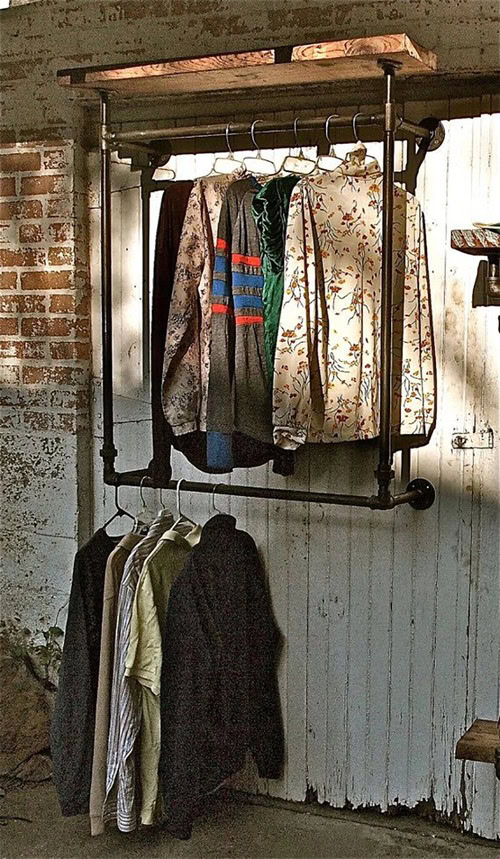
Single Hanging Clothing Rack

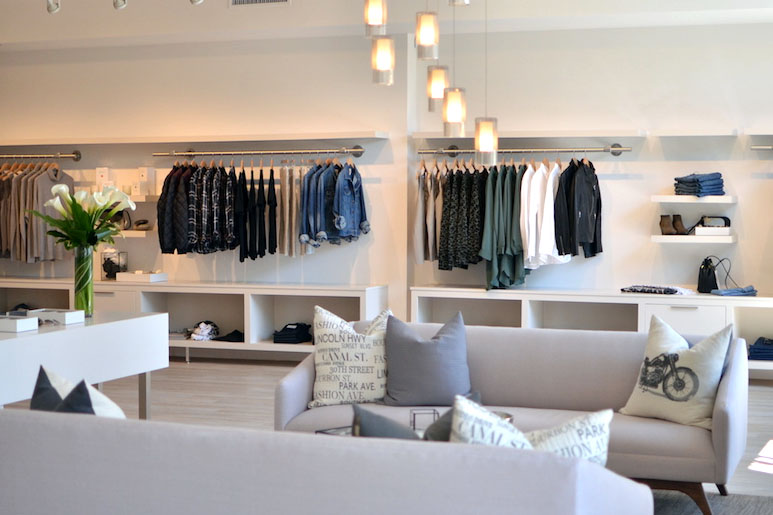
Sometimes simplicity is all you need. A single hanging wall mount clothing rack provides amble space to store everyday items without clutter. The design consists of one or two horizontal bars supported by wall-mounted flanges, offering reliable strength for shirts, dresses, or jackets. This type of rack is ideal for smaller spaces such as spare rooms, studio apartments, or compact retail areas. It’s a straightforward option that delivers practicality without unnecessary complexity.
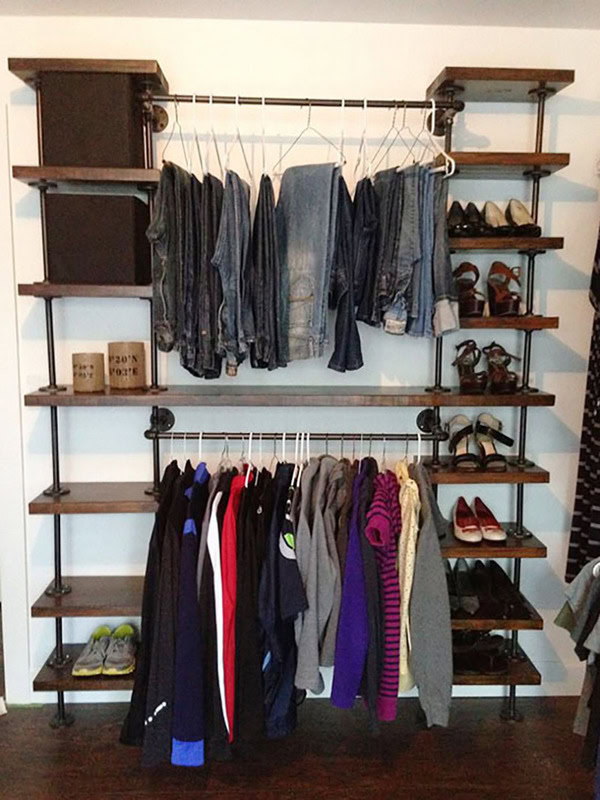
Clothing Shoe Rack

For those who need a multi-purpose solution, this design combines garment rails for hanging clothes with shelving for shoes or accessories. Mixed painted pipes with metallic fittings creates a stylish industrial aesthetic, making it suitable for both modern homes and boutique-style shops. The shelving can be customised to the exact width and depth you need, allowing for maximum functionality. By merging two storage systems into one, this is one of the most efficient wall mounted clothes rail ideas.

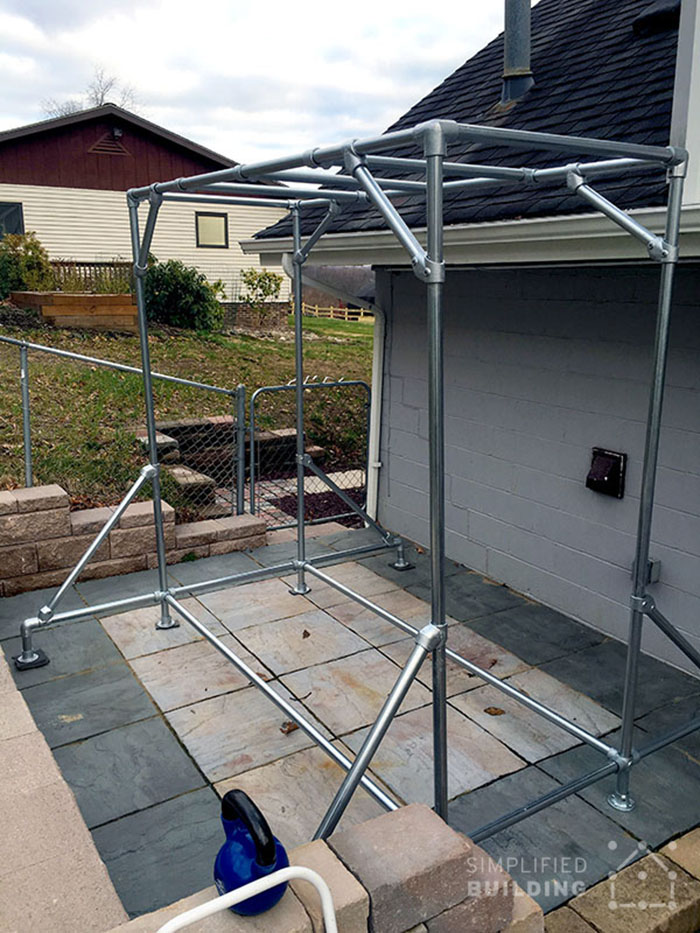
Entryway Clothing Rack

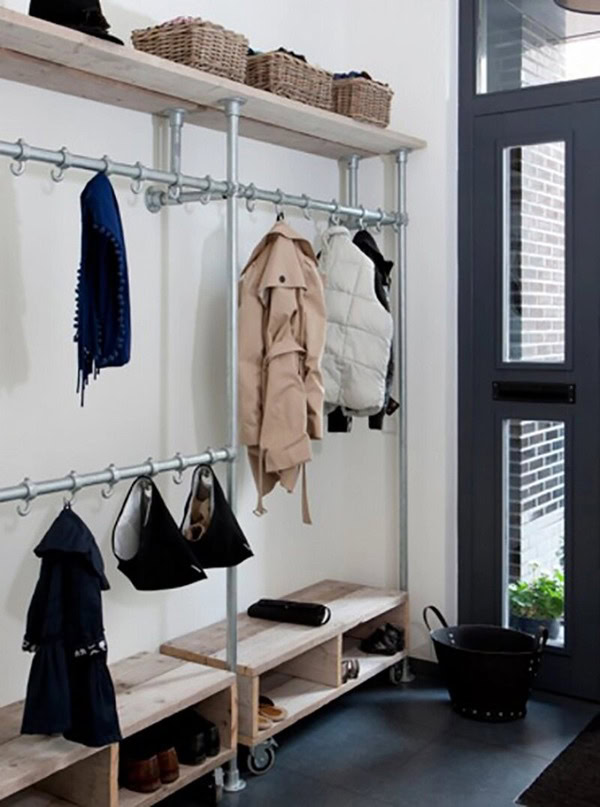
An “open concept” entryway rack is perfect for keeping outerwear, shoes, and bags near and accessible. Fitted with coat hooks, rails, and shelves, it helps households stay organised while providing a welcoming touch near the front door. This modular nature of tube and fittings means this design can be scaled to fit any entryway or mudroom. Whether you want a narrow rack for compact hallways or a larger system for a busy household, this solution keeps everyday items tidy and within easy each.

Floating Wall-Mounted Clothing Rack

Need to make the most of limited space? Floating racks are an excellent choice because they attach directly to the wall without floor supports. This frees up valuable floor area, creating an uncluttered and modern look. Floating garment rails can be used to create minimalist wardrobes, compact retail displays, or even open-plan storage solutions for lofts and apartments. Despite their clean design, the use of strong tube and fittings ensures the racks remain stable and durable.

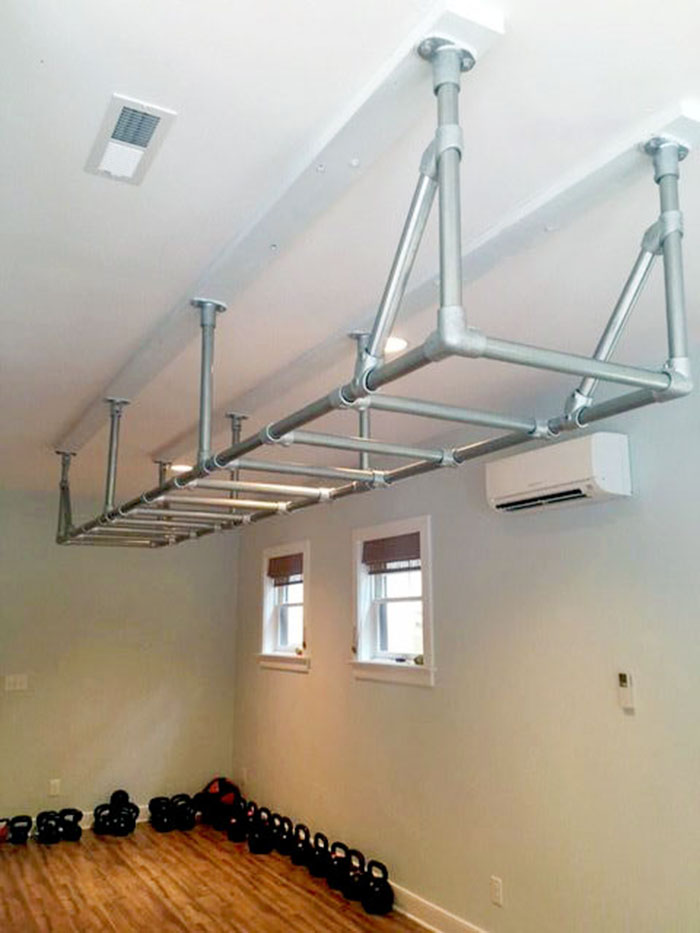
Ceiling-Mounted Clothing Rack

When wall space isn’t available, ceiling-mounted racks step in as a clever alternative. Suspended from above using fittings like flanges and elbows, they create hanging storage without touching the walls or floor. This makes them especially useful in small studios, retail windows, or areas where wall fixtures aren’t possible. The design is simple but highly functional, turning unused overhead space into practical storage solution.

Corner Wall-Mounted Clothing Rack

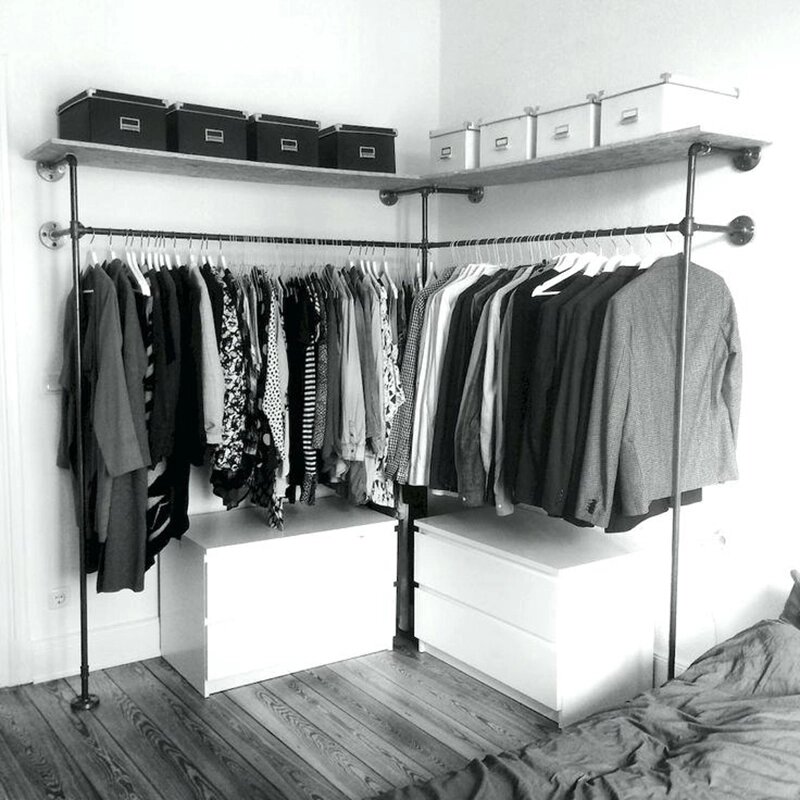
Corners often go unused, but with the right fittings, they can be transformed into efficient storage. A corner-mounted clothing rail is ideal for maximising space in smaller rooms, walk-in closets, or compact shops. The design can wrap nearly around two adjoining walls, creating extra hanging capacity without encroaching into the main area. With modular fittings, the rack can be adjusted to any angle, offering flexibility in even the most awkward spaces. 

Multi-Shelved Clothing Rack

This design combines shelving with garment rails to provide both hanging space and storage for folded clothing, shoes, or accessories. It’s ideal for anyone looking to create a more comprehensive organisation system. Adding baskets or decorative storage boxes keep the look tidy while enhancing functionality. Retailers can use the shelves for folded stock, while homeowners benefit from an all-in-one solution that keeps clothing neat and accessible. 

Customisation Made Easy

One of the greatest strengths of using tube and fittings is the ability to fully customise your wall mounted clothing rack. Whether you need to work around unusual spaces, build a heavy-duty rack for commercial use, or create a stylish feature for your home, modular fittings provide endless possibilities. The design can grow with your needs, start with a simple rail and expand with shelving, hooks, or additional bars as required.

Categories
Articles

15+ DIY home gym equipment ideas

15+ DIY home gym equipment ideas

The article is used with permission from Simplified Building
https://simplifiedbuilding.co.uk/projects/diy-home-gym-equipment

We get it. Going to the gym is not for everyone. Gyms can get overcrowded, expensive, inconvenient, embarrassing and whatnot. If you are looking to work out at home but don’t have the necessary equipment to do that, then read on: we’ve got more than 15 homemade gym equipment ideas that you can use both indoors and outdoors, in your home or garage gym.

Making your own gym equipment doesn’t have to be difficult. Our project ideas will show you how tube and fittings can be used to construct various workout setups to help you achieve your fitness goal, whereas this is through strength training, cross-fit, ballet or yoga. Read on:

Pull up and dip stations

If you are looking to build body mass and strength, then pull up bars and fitness towers are your best bet. Here are a few ideas for homemade strength equipment:

Workout tower

No need for more than one system when you can use a workout tower for multiple body weight exercises. Our Simple Fit Workout Tower is designed with multi-functionality in mind and is suitable for countless variations such as: pull-ups/chin-ups, dips, knee raises, abdominal exercises, push-ups and sit-ups.

It can be assembled in an hour or less to help you start your fitness workout as soon as possible and can be enjoyed in your garden or home.

DIY Dip Stand

A dip stand (or dip bars) will help you improve your upper body strength.

Build a full frame out of tube and fittings or follow our customer Erik’s example and combine galvanised tube with a wooden frame. The parallel steel bars rest in a circular grove cut out from the horizontal wood supports.

To keep the pipe bars from moving, a collar fitting is used on the inside of the wood boards. This fitting slides over the pipe bars and locks in place to keep the pipe bars from sliding.

At the top of the dip station, there are three horizontal bars. These add additional support to the structure but can also be used to do pull-ups. These pipe bars are connected using flanges.

Parallettes

Parallettes are lower versions of dip stations and are usually used for gravity training (calisthenics).

Using two long pieces of tube and 4 tube stubs, as well as flanges and 90 degree°, you can simply create your own seriously heavy duty parallel bars at home.

Freestanding pull-up frame

This pull-up frame was built by Charles Rankin in order to train for the world record for the number of chin-ups completed in 24 hours. But you don’t need to a world record trainee to build one just like it.

The pull-up station is completely free standing and has practically no give when completing pull-ups or chin-ups. One of the biggest advantages to building a pull-up bar stand like this one is that you can build it to whatever height you like. Also, unlike most gym equipment, it can easily disassembled and reassembled, and is completely weather proof, which means that you will be able to enjoy your workout in your home or your garden.

DIY pull up tower

Richard was looking for a modular workout equipment to fit on his balcony when he decided to design and build this pull-up tower. Multi-functional and easy to use, the unit serves as a full body workout unit, allowing for a series of pull-ups and dips to help you train your upper body thoroughly.

Wall mounted pull up bar with rings

This pull up bar with rings, used by CrossFit Vulcan, features different heights and has the ability to support multiple people.

Another Simplified Building customer, Brian, used a similar pull up bar structure to run small fitness classes and help physio therapy clients with their rehabilitation.

Outdoor workout station with high bars

This square workout station consists of 4 horizontal bars which can be adjusted to different heights to suit many different types of exercises. The bars can be loosened with just the turn of an Allen key, which makes for a quick and seamless transition.

Use it with rings, ropes or TRX equipment for a thorough, effective workout.

Punch bag frame

This cool project shows you how to build a wall-mounted punch bag out of Kee Klamp fittings and tube:

Balance and coordination workout systems

Take your ballet, yoga or pilates workout to a next level using equipment that is easy to DIY at home using just tube and Kee Klamp or Kee Lite fittings. You can easily modify these systems by adding and removing sections, or even reconfiguring the entire structure should you need to.

Here are some of our inspirational projects:

DIY lightweight ballet barre

This freestanding ballet barre was built by one of our customers for his 3 daughters who really wanted to take ballet classes at home. He used lightweight aluminium fittings and tube to construct the barre and included a mid rail so that the unit can be used by both adults and children at the same time.

The structure is perfect for barre classes, stretching or any other low impact workouts and is suitable for home or studio use.

DIY gymnastics bar

We’ve had multiple customers build gymnastics bars using Kee Klamp. This particular one was built by Brian as a Christmas present for his daughter.

A big advantage of using Kee Klamp fittings to build this type of structure is that the bar height is easily adjustable. By adjusting the set screw on each side of the gymnastics bar, the height can be increased or decreased to suit all heights.

Here is another example: Greg built an outdoor gymnastics frame for his daughter out of aluminium tube and clamps. This is a high bar for his 20 kg daughter to do gymnastics-like play on. The uprights are 1.5m tall, and the aluminium does flex gently when she swings on it. When the bar is in use, Greg uses a bouldering “crash pad” (mat) under the bar.

Greg says: “The height of the bar adjusts quickly for balance beam, ballet barre, penny drops, and swinging. It can be used as (or reconfigured to be) a play tent support, soccer goal, mini slackline (winching strap) frame, or Festivus pole. The legs are four three-foot pieces, the uprights are five feet, and the horizontals are four feet. Right now it doesn’t need bracing but that can be added when she gets heavier and swings on it more.”

Yoga trapeze frame

Caroline contacted our team in Ireland looking for a yoga trapeze frame that would help her do a full body workout, incorporating numerous yoga exercises and stretches for arms, legs, shoulders and backs. Caroline also used the workout frame for body weight exercises (improving core strength) and inversions (hanging upside down for further core strength and deeper stretching).

The tube clamps provided a tough, durable joint, while the industrial strength tube would be perfect in providing a strong frame which wouldn’t bend or collapse. And of course, the flexibility of the fittings meant the frame could be created a number of different ways if necessary.

Strength and agility equipment

Over the years, we noticed that customers use our tube and fittings system to build bespoke structures for cross fit, parkour or ninja obstacles. Because of its heavy duty nature and the fact that no welding is required on site, the Kee Klamp system has been successfully used to kit indoor gyms or outdoor obstacle courses, culminating with the construction of the equipment needed for Tag Chase, a new sport that has taken off in the US.

Indoor monkey bar

Monkey bars can be used to build strength in your upper body and core and can help improve coordination.

These monkey bars were built by Steve and they allow him and his daughter to train all year round in their home fitness studio. Use flanges to mount the structure to the ceiling (but please make sure that your ceiling is strong enough to hold all the weight).

DIY crossfit gym for your garden

This crossfit garden gym was built by one of our customers who wanted to enjoy a full body training at home. The fittings and tube are weather resistant, which means that you can leave the equipment outside without worrying that it will rust or mould.

Custom play and climb frame

Niall was looking to build a play space for his children, but he also wanted to make sure that the structure can be used by adults too for their fitness training. Besides workout stations (such as a pull-up bar and parallel bar for dips) the plan was to also include a slide, swing and trapeze, making sure that everyone in the family is entertained.

The result was this awesome custom built frame that the entire family gets to enjoy for years to come.

Custom built parkour frames

Parkour has become more and more popular in the past years, with more people taking an interest in it. We had several customers order tube and fittings to construct their own obstacles, whereas this is for use at home or in a larger setting, such as a gym or outside.

Here are a few examples of parkour equipment built by our customers:

Other climbing frames and obstacle courses

Climbing frames and obstacle courses are popular among our customers. Easy to design and build, these are very hard wearing and can be modified in no time, with the addition of a few fittings and tube.

See a few examples of structured built for climbing or obstacle courses:

Categories
Articles

20 Handrails to Help the Elderly

20 Handrails to Help the Elderly

The article is used with permission from Simplified Building
https://www.simplifiedbuilding.com/projects/handrails-to-help-the-elderly

Handrails to Help the Elderly

Getting older may mean your mobility could be getting limited, but it shouldn’t be the end of it. Installing handrails and different types of systems around the house can make it much more accessible for the elderly.

Whether you are looking to build handrails for yourself, or for a loved one who is getting a little older (despite them insisting they’re fine). Our team is around to provide help with your designs, and check out these ideas for other potential handrails around the house.

Indoor Ramp Railing

Indoor Ramp Railing

Having a ramp indoors makes accessibility a lot easier for the elderly, adding a handrail to it makes it that much more stable. This railing was built by Gerry in Arnold, Maryland for his restaurant. It is a simple railing that only requires two pipes and a couple fittings including the Flange and 90° Elbow.

Staircase and Upstairs Railing

Staircase and Upstairs Railing

This customer seamlessly blended their staircase railing into their upstairs railing so that they could have stability walking up the stairs and have safe access to the closet on the other side of the room. The railing up the staircase is similar to our Signature Wall Mount Simple Rail Handrail, which can then be easily connected to the upstairs railing using a 90 Degree Elbow.

Dual Handrail System 

Dual Handrail System 

In order to help their 86-year-old mother, this customer installed these Surface & Wall Mounted Railing Kits. The galvanised steel railing for these couple steps provides greater support and stability for older family members and guests.

Small Step Railing

Small Step Railing

Even for just a small step, making it easier for the elderly goes a long way. Mynor from Valley Home Medical Supply installed this simple railing for one of their clients. They used two Classic ADA Friendly Handrail Kits and painted them white to match the home. They said that the customer was very satisfied with the railing and can now safely access the backyard and porch.

Sloped Driveway Handrail 

Sloped Driveway Handrail 

Any sloped driveway can be difficult for both the homeowner and any guests. Richard had the idea of adding this exterior handrail to his driveway to make it safer for his friends and family visiting. He built this using a variation of the Classic Offset Surface Mount Railing and adding 514-7 ADA Internal Coupling to his kit. This extended the length of the railing to cover the whole driveway. This is perfect for elderly having to walk up and down sloped surfaces around the house.

Pool Patio Handrail

Pool Patio Handrail

The pool area can be a slippery place for not just the elderly, but everyone outside enjoying the space. To reduce the risk of anyone slipping, Greg installed this handrail for his pool patio steps by using a modified version of our Wall and Surface Mounted Stair Railing Kits.

Basement Stairs Handrail

Basement Stairs Handrail

After not having basement for several years, Matthew in Pennsylvania needed to install a railing after getting up in age and becoming empty nesters. He installed this railing using version of our hybrid stair railing kits along with Single Swivel Socket, Wall Flange, and Swivel Flange fittings. Matthew commented saying that this was an easy one-day project.

Wood Porch Metal Railing 

Wood Porch Metal Railing 

A wood railing is an effective one but can be hard to grip for the elderly due to the width and feel of the railing. Kevin in Georgia needed to meet his local building codes and wanted to create a railing that would provide safety and stability for visitors. He used a Wall Mounted Stair Railing Kit that easily drilled into both the existing wood railing and wall on the staircase.

Stone Path Handrail

Stone Path Handrail

For front entrances on potentially slippery surfaces, this Classic Offset Simple Rail Handrail Kit is perfect to provide stability. Whether for your front walkway or maybe a back patio and garden. Having this simple railing can it make it much more accessible for the elderly on possible uneven ground.

Outdoor Wood Ramp Railing

Outdoor Wood Ramp Railing

Having an outdoor ramp makes your home or business much more accessible for the elderly or disabled. This railing was designed and built by Todd in North Carolina for his wood ramp. This was a custom build that utilises multiple Kee Klamp fittings in their standard metal colour with pipe he had painted black to create a stylish look.

Wood Steps Railing

Wood Steps Railing

Another very simple railing, but one that makes a world of difference. Dan in Baton Rouge, Louisiana installed this railing using our Classic Limited Outdoor Railing Kit that he had powder coated in glossy black. Making these three simple steps that much easier for himself and guests to walk up.

Driveway Stairs Handrail

Driveway Stairs Handrail

Another driveway related railing, but this one has stairs that lead up from the bottom of the driveway and sidewalk up to the house. Bill decided he needed this for his driveway and installed an extended style of our Signature Inline Handrail Kit. Having a handrail that can assist the elderly who may have to walk up the driveway or stairs is a huge benefit to their safety.

Concrete Steps Handrail

Concrete Steps Handrail

Using a Classic Adjustable Simple Rail Handrail, this customer was able to create a safer entrance to their home. We offer many different types of stair handrails for your front steps that can best fit the size and style that will provide the best fit and support for your stairs.

Cottage Handrails

Cottage Handrails

A cottage is wonderful place to have family gathered at, or for where one might retire to. Installing handrails like a Classic Wall Mount Simple Rail Handrail or Aluminium Wall Mounted Railing can make the whole property more accessible for the elderly.

Long Gravel Stair Handrail

Long Gravel Stair Handrail

Longer stairs such as these can bring about an additional challenges for the elderly walking up. Additionally, the uneven ground of the gravel can add an additional challenge. This customer, Brent, created a great and wonderful looking solution. He installed beautiful 4×4’s with caps next to the stairs and then installed an extended Wall-Mounted Handrail to complete the project.

Metal Railing on Wood Deck

Metal Railing on Wood Deck

Another instance of implementing a metal railing on to an existing wood deck and railing. This Classic Wall Mount Simple Rail that was powder coated black to accent the current white railing, provides additional support and grip for someone walking down these steps into their backyard.

Garden Steps Handrail 

Garden Steps Handrail 

These couple steps down to the garden may not be much, but for the elderly this could be a bit of a challenge. This Signature Offset Simple Rail Handrail was installed by Rob from Florida, and it makes these steps safer to access the garden and he ordered the pipe and fittings in a powder coated glossy white which beautifully match the stairs leading to it.

Simple Front Steps Handrail

Simple Front Steps Handrail

This Classic Limited Simple Rail Handrail was installed by our customer Mike in Tennessee. He wanted to install this handrail on his mother’s front steps in hopes to encourage her mobility by making it easier for her. Here is what Mike had to say: “The stair rail was for my mother who has difficulty navigating steps. I installed the handrail in the center of the steps. That way she can use the hand of her choice. I painted the rail with a black hammer finish. It looks great and is super strong. Thank you for a great product!” He later added that since installing the railing, his mother has been going to the mailbox, yard, etc. She wouldn’t get out before and the railing has been invaluable to her mobility.

Stone Steps Handrail 

Stone Steps Handrail 

Anthony’s mother-in-law was having difficulty walking up these stairs at their family’s cottage. So being the amazing son-in-law that he is, he installed this Signature Offset Railing Kit to provide a sturdy handrail that she could use when climbing these stairs. Additionally, the galvanised steel and simple look of the railing compliment the house perfectly.

Sturdy Handrail for Outside

Sturdy Handrail for Outside

Rounding out our list here we have a Classic Adjustable Simple Rail Handrail that this customer installed for these steps overlooking a beautiful lake. This railing was painted white to match the beautiful landscape and helps provide additional support for those walking up these steps as they walk to and from the lake.

Hopefully this was all of some help to guide or inspire your next project. As always, our team is available to assist you for your handrail project.

Why Kee Klamp?

Resistant – Kee Klamp fittings are hot dipped galvanised and incredibly resistant to rust, so you can safely use them for outdoor structures. Customers have used these to build handrails on docks for example.

No welding – Kee Klamp fittings do not require any welding, which means that they can be used by anyone, including domestic customers, for a variety of projects. All you need is an allen key!

Categories
Articles

Custom YouTube Studio Desk

Custom YouTube Studio Desk

The article is used with permission from Simplified Building

https://www.simplifiedbuilding.com/projects/custom-youtube-studio-desk

Custom DIY YouTube Table

With YouTube providing a platform for anyone anywhere to create content, more and more independent creators are looking to improve their production quality and creative spaces. One of these independent creators is Tommy Callaway.

Tommy reached out to Kee Safety (USA) in April of 2020 wanting to build a desk similar to one featured in 2017.

Tommy had very specific plans for this desk. He needed it to be a very specific height for filming videos and a specific length and depth to fit perfectly in his space which, in this case, is a small bedroom. He also wanted it to be on wheels so he could use it as an editing and work desk when he wasn’t using it as a set piece in his videos.

Let’s take a deeper look at Tommy’s YouTube studio desk:

Tommy’s YouTube Studio Desk Details

Although Tommy’s desk appears to be a complicated design, in actuality, it’s constructed entirely out of just four types of Kee Klamp fittings, pipe, and some casters. Tommy’s desk is also unique in the fact that Tommy shot a video documenting the construction of the desk and detailing where certain odds and ends such as the tabletop were sourced from. Instead of reading something about Tommy’s desk, why not hear about it directly from Tommy’s mouth?

Like we said before, Tommy’s desk only utilizes four different fittings. They are as follows:

Parts you’ll need

The 10-7 single socket tees are used to attach the shelving to the legs and the 61-7 flanges are used to affix the table top to the frame. The 20-7 side outlet elbows are used for the corners of the shelves and the 21-7 side outlet tees are used to attach the mid-support to the shelves. You can see the majority of these various fittings in use below.

YouTube DIY table
Final Notes About Tommy’s YouTube Studio Desk Project

Tommy was able to utilize Kee Klamp fittings to build something that stands out from the crowd. The crowd, in this case, being the entirety of the YouTube community. We hope to see great things from Tommy on the platform and are confident that he’s got a desk that will fit his needs and last him a very, very long time. We’ve compiled a gallery of Tommy’s desk in various stages of completion that you can view below.

Need Assistance in Building Your Custom DIY YouTube Studio Desk?

While we believe the first step to being successful on YouTube is focusing on making your content relevant and genuine, if you’re in a place where you’d like to upgrade your studio, feel free to reach out to our team. We would love to play a part in making your YouTube studio desk a reality!

Categories
Articles

Building Greener Tomorrow

Building Greener Tomorrow

Sustainable engineering practices are becoming increasingly important in today’s world. With the growing concern for the environment, it is essential to create environmentally friendly and efficient solutions for a more sustainable future. In this blog post, we will discuss the importance of sustainable engineering practices and their role in building a greener tomorrow.

Sustainable Engineering

Sustainable engineering is the practice of designing, building, and operating systems, structures, and processes that minimize environmental impact, conserve natural resources, and promote social well-being. It involves the use of eco-friendly design, green building practices, and sustainable construction techniques to create sustainable solutions.

Sustainable engineering practices are essential for building a greener tomorrow. They involve the use of eco-friendly design, green building practices, and sustainable construction techniques to create sustainable solutions. Environmental Engineer Emma can find green building certifications, sustainable materials databases, environmental impact assessment tools, and sustainability conferences to help her stay up-to-date with the latest sustainable engineering practices. By reducing environmental impact through design, staying compliant with green building standards, and creating eco-friendly solutions, we can build a more sustainable future.

Eco-Friendly Design

Eco-friendly design is an essential aspect of sustainable engineering. It involves designing products, systems, and processes that minimize environmental impact and promote sustainability. Eco-friendly design can be achieved by using sustainable materials, reducing waste, and minimizing energy consumption.

Eco-friendly design is an essential aspect of sustainable engineering. It involves designing products, systems, and processes that minimize environmental impact and promote sustainability. Eco-friendly design can be achieved by using sustainable materials, reducing waste, and minimizing energy consumption. One of the most significant benefits of eco-friendly design is that it can help reduce the carbon footprint of a product or process. By reducing the amount of energy required to produce a product or service, we can reduce the amount of greenhouse gases emitted into the atmosphere.

Green Building Practices

Green building practices are another critical aspect of sustainable engineering. They involve the use of sustainable construction techniques to create environmentally friendly buildings. Green building practices can include the use of sustainable materials, energy-efficient lighting and HVAC systems, and water conservation techniques.

Green building practices are another critical aspect of sustainable engineering. They involve the use of sustainable construction techniques to create environmentally friendly buildings. Green building practices can include the use of sustainable materials, energy-efficient lighting and HVAC systems, and water conservation techniques. One of the most significant benefits of green building practices is that they can help reduce the environmental impact of buildings. By using sustainable materials and energy-efficient systems, we can reduce the amount of energy required to operate a building and minimize the amount of waste generated.

Environmental Engineering

Environmental engineering is a branch of engineering that focuses on the protection of the environment and public health. It involves the use of engineering principles to design and implement solutions that minimize environmental impact and promote sustainability. Environmental engineering can include the use of environmental impact assessment tools, sustainable materials databases, and green building certifications.

Environmental engineering is a branch of engineering that focuses on the protection of the environment and public health. It involves the use of engineering principles to design and implement solutions that minimize environmental impact and promote sustainability. Environmental engineering can include the use of environmental impact assessment tools, sustainable materials databases, and green building certifications. One of the most significant benefits of environmental engineering is that it can help reduce the environmental impact of industrial processes. By designing and implementing sustainable solutions, we can minimize the amount of waste generated and reduce the amount of energy required to operate industrial processes.

Sustainable Construction

Sustainable construction is the practice of designing and building structures that minimize environmental impact and promote sustainability. It involves the use of sustainable materials, energy-efficient systems, and green building practices to create environmentally friendly buildings. Sustainable construction can help reduce the environmental impact of construction projects and promote sustainability.

Sustainable construction is the practice of designing and building structures that minimize environmental impact and promote sustainability. It involves the use of sustainable materials, energy-efficient systems, and green building practices to create environmentally friendly buildings. Sustainable construction can help reduce the environmental impact of construction projects and promote sustainability. One of the most significant benefits of sustainable construction is that it can help reduce the amount of waste generated during construction projects. By using sustainable materials and green building practices, we can minimize the amount of waste generated and reduce the environmental impact of construction projects.

Conclusion

Sustainable engineering practices are essential for building a greener tomorrow. They involve the use of eco-friendly design, green building practices, and sustainable construction techniques to create sustainable solutions. Environmental Engineer Emma can find green building certifications, sustainable materials databases, environmental impact assessment tools, and sustainability conferences to help her stay up-to-date with the latest sustainable engineering practices. By reducing environmental impact through design, staying compliant with green building standards, and creating eco-friendly solutions, we can build a more sustainable future.

Build Your Eco-Friendly Solutions with Select FIT New Zealand

Are you looking for a way to build your own eco-friendly design projects? Whether you want to create a green house, a solar panel, or a compost bin, you can do it with the help of Kee Klamp fittings.

These fittings are versatile and easy to use components that allow you to connect tubes and pipes of different sizes and shapes. You can use them to create sturdy and durable structures that can withstand various weather conditions and loads. The fittings are also reusable and recyclable, which means you can reduce your environmental impact and save money.

At selectfit.co.nz, you can find a wide range of pipe fittings that are made of high quality steel and have a galvanised finish that prevents rust and corrosion. They are also compliant with EN 14122: 2016 & OSHA requirements and CE marked for assured and safe operation.

To use pipe fittings, you don’t need any special tools or skills. You just need a hex key and a pipe cutter to tighten the fittings and cut the tubes to the desired length. You can also check out our blogs to get some inspiration and tips on how to build your own eco-friendly design projects.

Related Blog Posts

If you are interested in building your own greenhouse, you may want to check out some of the best greenhouse blogs we have on our website

Categories
Articles

Top 10 Safety Tips for Working on Heights

Top 10 Safety Tips for Working on Heights

Whether you find yourself working at heights daily or occasionally, safety should always remain a top priority. It takes just one misstep to transform a routine task into a potentially fatal incident. It is your duty to ensure the safety of your employees whenever they may be exposed to fall hazards.

Don’t have time to read? Check out the infographic we made for you!

Understanding Work at Height

Working at height encompasses any task where there is a potential for an individual to fall and sustain injury. This can include activities involving ladders, working near the edge of a roof, navigating floor openings, or operating around loading docks. Whether you’re a seasoned pro or a rookie, safety should always be the top priority. So, before you take that leap, let’s delve into the top 10 safety tips that could save your life while working on heights.

Practical Safety Tips for Working on Heights

1. Proper Training is Non-Negotiable

Before you ascend to any height, adequate training is not just recommended—it’s absolutely essential. Proper training serves as the bedrock on which all other safety measures are built. It equips you with the knowledge and skills needed to minimize risks and navigate the challenges of working at heights.

Identify and Rectify Gaps in Training

Regularly updating your skills and knowledge ensures that you remain at the forefront of safety practices. As the industry evolves and new techniques and technologies emerge, it’s essential to stay up-to-date. 

To identify and rectify gaps in your training, consider the following steps:

  1. Self-Assessment: Take the initiative to assess your own training needs. Reflect on your experiences and identify areas where you may feel less confident. It could be a specific skill or knowledge gap related to your work at heights.

  2. Consult with Experts: Engage in discussions with experienced colleagues or trainers who can provide valuable insights into the evolving safety landscape in your field. They can guide you on the latest best practices and industry-specific knowledge.

  3. Training Programs: Explore training programs designed to address your specific needs. There are numerous courses and certifications available that cater to various aspects of working at heights, from fall protection to rescue techniques. Choose the ones most relevant to your work.

  4. Regular Refresher Courses: Even after you’ve completed your initial training, don’t consider it a one-off event. Regular refresher courses can reinforce your skills and introduce you to the latest safety protocols. These courses can help keep you at the top of your game.

  5. Stay Informed: Stay updated on industry news and safety regulations. Subscribe to industry magazines, follow relevant websites, and participate in safety forums to gain a deeper understanding of emerging trends and challenges.

Remember, it’s not just about ticking a box; it’s about being committed to your safety and the safety of your colleagues. By identifying and rectifying training gaps, you equip yourself with the knowledge and skills necessary to make informed decisions and work with confidence at heights. Your commitment to training is a testament to your dedication to safety, and it’s a choice that can make all the difference in the world of heights

2. Use Appropriate Safety Equipment

When you’re working at heights, your safety gear isn’t just a set of tools – it’s your best friend. Helmets, harnesses, and safety lines are your lifelines, and they play a pivotal role in keeping you safe when you’re soaring above the ground. It’s essential to understand that there’s no room for compromise when it comes to the quality and suitability of your safety equipment.

Don't Skimp on Quality

Cutting corners when it comes to safety equipment is a decision that should never be entertained. The stakes are simply too high. Your safety gear is not an area where you should seek cost savings or opt for subpar options.

Here’s why investing in high-quality gear is an investment in your protection:

  1. Reliability: High-quality safety gear is engineered and tested to meet rigorous safety standards. It’s built to withstand the demands of working at heights and is less likely to fail in critical moments. This reliability is a key factor in preventing accidents.
  2. Durability: The wear and tear on safety equipment can be considerable. Cheap or low-quality gear may wear out quickly or deteriorate due to environmental factors. Quality gear, on the other hand, is designed for longevity, ensuring it remains effective over time.
  3. Comfort: Comfort is a significant factor in ensuring that safety gear is worn consistently. High-quality gear often includes ergonomic features and adjustments that make it more comfortable, reducing discomfort and increasing compliance with safety protocols.
  4. Customization: Quality safety gear often allows for customization to fit your specific needs and body type. Properly fitting gear is crucial for its effectiveness, and high-quality options provide these customization features.
  5. Compliance: Safety regulations and standards frequently require the use of certified safety equipment. By investing in reputable, high-quality gear, you ensure that you’re meeting these legal requirements, avoiding potential fines and penalties.
  6. Peace of Mind: Knowing that you’re equipped with top-tier safety gear instills a sense of confidence in your own safety, allowing you to focus on your work rather than worrying about your equipment’s reliability.
  7. Life-Saving Benefits: In a life-or-death situation, the reliability and performance of your safety gear can be the difference between a close call and a tragedy. High-quality equipment increases your chances of a safe outcome.

To ensure you have the best protection possible, invest in safety equipment from reputable manufacturers with a proven track record for quality and safety. While it might entail a higher initial cost, it’s a small price to pay when weighed against the value of your own safety and that of your colleagues. Always remember that when you’re working at heights, there’s no substitute for high-quality safety gear. It’s not an expense; it’s an essential investment in your well-being. Your safety gear is your lifeline, and it should be the best one you can afford.

3. Regular Equipment Inspection

Your safety gear is your lifeline when working at heights, but it’s only effective when it’s in pristine condition. Regularly inspecting and maintaining your equipment is not just a good practice – it’s a crucial aspect of ensuring your safety when you need it the most.

The Importance of Maintenance.

Understanding the significance of maintaining your gear is not just about extending the equipment’s lifespan; it’s about extending your own life.

Here’s why regular equipment inspection and maintenance are absolutely imperative:

  1. Reliability: Equipment that undergoes regular inspection is less likely to fail when it matters the most. A well-maintained harness, helmet, or lifeline can make the difference between a close call and a catastrophe.

  2. Safety Compliance: Regular maintenance ensures that your gear remains compliant with safety regulations and standards. Non-compliant equipment can lead to accidents and legal consequences.

  3. Extended Lifespan: While the primary goal is safety, proper maintenance also extends the lifespan of your equipment. This not only saves you money in the long run but also contributes to a sustainable approach by reducing waste.

  4. Preventing Hidden Issues: Regular inspections can uncover hidden issues that might not be apparent during casual use. These issues could be wear and tear, damaged components, or small defects that can become major problems if left unaddressed.

  5. Increased Comfort: Well-maintained equipment tends to be more comfortable to wear, encouraging consistent use. Uncomfortable gear can lead to non-compliance, putting your safety at risk.

  6. Peace of Mind: Knowing that your gear has been meticulously inspected and maintained instills confidence that it will perform as expected when you need it most. This peace of mind is invaluable when working at heights.

Regular equipment inspection and maintenance are essential safety practices. By taking these steps, you not only ensure the reliability of your safety equipment but also demonstrate your commitment to your own safety and that of your colleagues. Remember, your gear is not just a set of tools; it’s your lifeline in the world of heights, and it deserves the utmost care and attention to detail.

4. Assess Your Work Environment

Every work environment at heights is unique and presents its own set of challenges. Whether you’re scaling a skyscraper, working on a construction site, or maintaining a telecommunications tower, comprehending the specific hazards and conditions of your work site is crucial for ensuring your safety.

Environmental Hazards

Environmental hazards can be particularly unpredictable and unforgiving when you’re working at heights. Identifying common environmental hazards, such as strong winds, rain, or low visibility, and developing strategies to mitigate their impact on your work is paramount.

Here’s why assessing your work environment and understanding these hazards are essential:

  1. Risk Mitigation: Identifying potential environmental hazards allows you to plan and take preventive measures to reduce risks. It enables you to proactively address issues before they become emergencies.

  2. Adaptability: When you understand the environmental conditions, you can adapt your work methods and procedures to ensure safe operations. This flexibility is vital in high-risk environments.

  3. Emergency Preparedness: Knowing the environmental challenges you may face equips you to be better prepared for emergencies. You can have the necessary equipment and procedures in place to respond effectively.

  4. Compliance: In many industries, there are specific safety regulations related to environmental conditions. By complying with these regulations, you not only enhance safety but also avoid legal complications.

  5. Team Safety: By understanding environmental hazards, you can communicate and collaborate effectively with your team to ensure everyone’s safety. Team members can watch out for each other and provide support when needed.

In the realm of heights, environmental hazards can be formidable adversaries. However, with thorough assessment, proactive planning, and effective mitigation strategies, you can maintain a safe work environment even in the face of nature’s unpredictability. By staying informed and prepared, you and your team can work at heights with confidence, knowing that you have taken every possible measure to ensure safety.

5. Plan and Communicate

Safety is not an individual endeavor when working at heights; it’s a collective responsibility. Creating a culture of safety where everyone is involved is paramount. This involves devising a safety plan and ensuring effective communication within your team. Doing so can prevent accidents and, quite literally, save lives.

Create a Safety Plan

Developing a comprehensive safety plan is the cornerstone of ensuring safety at heights. This plan should encompass all relevant information, such as potential hazards, emergency procedures, and safety protocols. The goal is to ensure that every team member is well-informed and actively engaged in maintaining safety.

Here’s why creating a safety plan and effective communication are fundamental:

  1. Preventative Measures: A well-structured safety plan enables you to identify potential hazards in advance and take preventative measures to minimize risks. It’s a proactive approach to safety.

  2. Emergency Response: In the event of an emergency, a safety plan outlines clear and efficient emergency response procedures. This preparation can make a significant difference in the outcome of critical situations.

  3. Consistency: A safety plan establishes a consistent framework for everyone to follow. It ensures that safety protocols are standardized, reducing confusion and the risk of human error.

  4. Teamwork: Safety is a team effort. By communicating the plan to your team and fostering a culture of safety, you create a supportive environment where everyone looks out for each other.

  5. Legal Compliance: Many industries have specific safety regulations that require the development and implementation of safety plans. Adhering to these regulations not only enhances safety but also keeps you in legal compliance.

A well-constructed safety plan, coupled with effective communication, fosters an environment where safety is not just a rule but a shared value. It ensures that everyone is actively engaged in maintaining a safe working environment, reduces the likelihood of accidents, and ultimately saves lives. Remember, when you’re working at heights, your team’s safety is your safety, and a well-communicated safety plan is the linchpin of that collective responsibility.

6. Mind the Weather

Weather conditions are a critical factor that can significantly impact safety when working at heights. Staying vigilant about changing weather patterns and taking appropriate precautions is essential to ensure your safety and that of your team.

The Wind Factor

Strong winds can be particularly challenging when you’re working at heights. Learning to recognize the signs of dangerous wind conditions and adjusting your work accordingly is crucial.

Here’s why paying attention to the weather, especially the wind factor, is of paramount importance:

  1. Risk Mitigation: Being aware of changing weather patterns, especially strong winds, allows you to take proactive measures to mitigate risks. It’s a key element in preventing accidents and ensuring your safety.

  2. Adaptation: Understanding the wind factor empowers you to adapt your work methods and procedures to maintain safety. This adaptability is essential in high-risk environments.

  3. Emergency Preparedness: Being weather-conscious equips you to be better prepared for emergencies related to adverse weather conditions. You can have the necessary equipment, procedures, and evacuation plans in place.

  4. Compliance: Many industries have specific safety regulations related to working in adverse weather conditions. By complying with these regulations, you enhance safety and avoid potential legal complications.

  5. Team Safety: Being vigilant about the weather and the wind factor enables effective communication within your team. When everyone is aware of the conditions, they can collectively ensure safety.

Safety when working at heights is non-negotiable, and weather-related risks are a critical part of that equation. By being attentive to the weather, particularly the wind factor, you can ensure that your work environment remains safe. It’s not just about following guidelines; it’s about being prepared and proactive in the face of nature’s unpredictability. Your vigilance regarding the weather can prevent accidents, save lives, and ensure that everyone returns home safely.

7. Keep an Eye on Your Colleagues

Working at heights is more than just an individual task; it’s a team effort. Always keeping an eye out for your colleagues and maintaining effective communication is fundamental. Your fellow workers are not only your teammates; they are your safety net.

Teamwork and Communication

Creating a culture of teamwork and open communication is the heart of safety in any workplace, especially when working at heights. Encouraging your team to watch out for each other and speak up about any safety concerns is not just a suggestion; it’s a necessity.

Here’s why teamwork and communication are so crucial:

  1. Mutual Protection: When you watch out for your colleagues, you’re providing an extra layer of protection. They, in turn, are doing the same for you. It’s a collective effort to ensure safety for everyone involved.

  2. Swift Response: Effective communication means that safety concerns can be addressed promptly. If someone notices an unsafe situation or behavior, they can alert the team, allowing for a quick response and mitigation of potential risks.

  3. Shared Responsibility: Safety is not the responsibility of a single person; it’s a shared responsibility. When everyone is engaged in safety practices, the entire team benefits from a safer working environment.

  4. Alertness: Encouraging teamwork and communication keeps everyone alert and vigilant. It ensures that potential hazards and risks are continuously assessed, reducing the chance of accidents.

  5. Conflict Resolution: Open communication can also help resolve conflicts or misunderstandings among team members. A harmonious working environment enhances safety.

Remember, in the world of heights, your colleagues are not just coworkers; they are your lifeline. By fostering teamwork and open communication, you create a safety net that can make the difference between a safe working day and a catastrophic accident. Safety is not just an individual endeavor; it’s a collective effort where everyone plays a role in ensuring that everyone returns home safely.

8. Respect Weight Limits

Respecting weight limits is vital when using ladders, scaffolds, or any other elevated structure. Exceeding these limits can lead to catastrophic accidents.

Weight-Bearing Structures

Understanding the weight-bearing capacity of the structures and equipment you are using and adhering to the specified limits is crucial.

Here’s why respecting weight limits is of paramount importance:

  1. Structural Integrity: Weight limits are set to ensure the structural integrity of the equipment and structures. Exceeding these limits can result in damage or failure, endangering everyone on or around them.

  2. Stability: Overloading can compromise the stability of structures, increasing the risk of collapses or falls. Adhering to weight limits helps maintain a stable working environment.

  3. Equipment Longevity: Excessive weight can cause premature wear and tear on equipment, reducing its lifespan and effectiveness. Respecting weight limits ensures that your equipment remains in good condition.

  4. Legal Compliance: In many industries, regulatory bodies mandate adherence to weight limits. Violating these limits can lead to legal consequences.

  5. Risk Reduction: Respecting weight limits is a proactive measure that reduces the risk of accidents, injuries, and fatalities. It’s a fundamental aspect of safety when working at heights.

Remember, when you’re working at heights, respecting weight limits is not just about following the rules; it’s about prioritizing safety. It’s about making informed decisions that protect your well-being and the well-being of your colleagues. By adhering to weight limits, you contribute to a safer working environment, reduce the risk of accidents, and ensure that you and your team can perform tasks at heights with confidence and security.

9. Step with Caution

Moving around at heights is not a casual stroll. Walking with care, maintaining your balance, and ensuring secure footing are paramount. Your safety depends on it.

Ladder Safety

When using ladders, following safety guidelines to the letter is essential. Ensure proper placement, maintain a firm grip, and always face the ladder while ascending or descending.

Here’s why stepping with caution and ladder safety are critical:

  1. Balance and Stability: Stepping with caution and using proper ladder safety techniques is fundamental for maintaining balance and stability at heights. A fall from a ladder can result in severe injuries.

  2. Equipment Integrity: Using ladders correctly ensures that the equipment remains in good condition. Misuse or abuse can lead to equipment failure.

  3. Efficiency: Following ladder safety guidelines enhances the efficiency of your work by allowing you to focus on the task at hand rather than worrying about your safety.

  4. Legal Compliance: Many jurisdictions have strict regulations regarding ladder safety. Adherence to these rules is not only vital for safety but also for legal compliance.

  5. Team Safety: Proper ladder safety is also about setting an example for your team. When they see you following safety protocols, they are more likely to do the same.

Safety begins with every step you take, especially at heights. By stepping with caution and adhering to ladder safety guidelines, you reduce the risk of accidents and ensure that you can complete your tasks safely and efficiently.

10. Emergency Preparedness

Despite all precautions, accidents can happen. Being prepared for emergencies is crucial. Learning basic first aid skills and developing an emergency response plan are invaluable.

First Aid Basics

Equipping yourself with essential first aid knowledge, such as how to administer CPR, control bleeding, or handle minor injuries, is not just a good practice – it can be a lifesaver. Your prompt response can make a significant difference in an emergency situation.

Here’s why emergency preparedness and first aid basics are so important:

  1. Immediate Assistance: In the event of an accident or medical emergency, immediate first aid can stabilize the injured person’s condition and potentially save their life.

  2. Preventing Further Harm: Properly administered first aid can prevent further harm or complications from injuries. It buys time until professional medical help arrives.

  3. Team Safety: When you and your team are equipped with first aid knowledge, you create a safety net for each other. You can provide assistance in critical moments.

  4. Emergency Plan: Developing an emergency response plan ensures that everyone knows how to react in various emergency scenarios. It minimizes confusion and chaos during critical moments.

  5. Legal Requirements: In many workplaces, having individuals trained in first aid is a legal requirement. Compliance with these regulations is essential for safety and legal reasons.

Remember, accidents are unpredictable, and being prepared can be a lifeline for yourself and your colleagues. By having a solid emergency plan and knowledge of first aid basics, you’re not just ensuring safety; you’re making a commitment to the well-being of everyone working at heights. Safety isn’t just about preventing accidents; it’s also about knowing how to respond when the unexpected occurs.

Conclusion

Working at heights is an exhilarating yet high-stakes job. Safety should never be compromised. By following these top 10 safety tips, you can significantly reduce the risks associated with working at heights. Remember, a moment of carelessness can have life-altering consequences, so stay alert, prioritize safety, and ensure you and your team return home safely after each shift.

Safety is Your Responsibility!

Safety is not just a rule; it’s a value. It’s your responsibility to uphold it. Take it seriously, follow the guidelines, and always choose safety first.

Categories
Articles

What fixings to use when installing a Kee Klamp handrail kit

What Fixings to use when installing a Kee Klamp handrail kit

Selecting the correct fixing depends on the material you need to install the handrail into. You will need to use different fixtures for different surfaces and this article will explain how to do that.

We use Kee Klamp fittings and galvanised steel to construct our easy-to-install outdoor handrail kits.

Use this as general guidance only; if you are ever unsure or can’t find the information you need for your project, ask a fixings specialist or a local DIY store for advice.

You can either download the PDF version of the ‘Hardware instructions’ or read the article below:

Types of fixings you need to install a Kee Klamp handrail

Image – Coach Screws

Coach Screws

Use 1: Connect handrail feet to Timber

Use Coach Screws to connect the handrail feet (usually made of type 62 fittings) to timber surfaces. You will probably need 2 x Coach Screws for each flange you want to fix into a timber surface.

Specifications for Coach Screws:

  • Type: M12 x 65
  • Length: 65 mm

Image – Coach Screws + Universal Plugs

Use 2: Connect wall plates to concrete / brick surfaces

Use Coach Screws with Universal Plugs to connect wall base plates (usually the type C58 fitting) to either concrete or brick walls. You will need a combination of 2 x Coach Screws + 2 x Universal (Fischer) Plugs for each fitting you want to fix into the wall.

Specifications for Coach Screws:

  • Type: M10 x 65
  • Length: 65 mm

Specifications for Universal Plugs:

  • Type: Nylon UX universal plugs
  • Diameter: 10 mm

Image – Throughbolts

Sleeve anchors

Use Sleeve Anchors to connect the handrail feet (usually made of type 62 fittings) to either concrete or brick surfaces.

You will need 2 x Sleeve Anchors for each flange you want to fix into concrete/ brick.

Specifications for Sleeve Anchors:

  • Type: M12 x 75 mm
  • Diameter: 12 mm

Image – Hex roof screws

Self-tapping Screws / Light duty sheet to steel hex roof screws

Self-tapping Screws are usually recommended to fix the tube into specific Kee Klamp fittings, such as type 518 or 570.

You will probably need 2 x Self-tapping Screws for each Kee Klamp fitting.

Specifications for Self-tapping Screws:

  • Length: 25 mm
  • Diameter: 5.5 mm

Image – Pozi Screws + Wall Plugs

Pozi Screws

Use a combination of Pozi Screws and Wall Plugs to mount a wall bracket (type 570) to timber walls.

You will need a combination of 3 x Pozi Screws + 3 x Plastic Contract Wall Plugs for each fitting.

Specifications for Pozi Screws:

  • Type: 5.0 x 50 mm
  • Length: 50 mm

Specifications for Plastic Contact Wall Plugs:

  • Diameter: 7 mm

How to fix a Kee Klamp handrail depending on the surface

Fix the handrail into timber

If you are looking to fix a handrail into timber, you will need the following fixings:

  • For handrail feet: 2 x Coach Screws are required for each flange (foot) that you are fixing into a timber floor.
    See specs for Coach Screws
  • For wall fittings: Use a combination of 3 x Pozi Screws + 3 x Plastic Wall Plugs to connect Kee Klamp wall fittings (such as Type 570) into a timber wall.
    See specs for Pozi Screws and Plugs
Fix the handrail into concrete

If you are looking to fix a handrail into a concrete surface, you will need the following fixings:

  • For handrail feet: 2 x Sleeve Anchors are required for each flange (foot) that you are fixings into a concrete floor.
    See specs for Sleeve Anchors
  • For wall fittings: Use a combination of 2 x Coach Screws + 2 x Universal Plastic Plugs to connect Kee Klamp base fittings (such as Type C58) into a concrete wall.
    See specs for Coach Screws and Plugs
Fix the handrail into brick

If you are looking to fix a handrail into brick, you will need the following fixings:

  • For handrail feet: 2 x Sleeve Anchors are required for each flange (foot) that you are fixing into a brick floor.
    See specs for Sleeve Anchors
  • For wall fittings: Use a combination of 2 x Coach Screws + 2 x Universal Plastic Plugs to connect Kee Klamp base fittings (such as Type C58) into a brick wall.
    See specs for Coach Screws and Plugs
Fix the galvanised tube into other Kee Klamp fittings

If you are looking to connect tube to another Kee Klamp fitting (such as type 518 or 570 fittings), you will need the following fixings:

What fixings you need depending on your Kee Klamp handrail kit

Fixings for a floor mounted handrail

All our handrail kits use type 62 flanges for feet. Here are the fixings (not included with the kits) you would need to install these rails:

  • Fixing type 62 fittings into timber: Use 2 x Coach Screws for each fitting
  • Fixing type 62 fittings into concrete: Use 2 x Sleeve Anchors for each fitting
  • Fixing type 62 fittings into brick: Use 2 x Sleeve Anchors for each fitting
Fixings for a wall-mounted handrail

Our wall handrail kits use various Kee Klamp fittings to fix into a wall. Here are the fixings (not included with the kits) you would need:

  • Fixing into concrete: Use a combination of 2 x Coach Screws + 2 x Universal Wall Plugs for each fitting
  • Fixing into brick: Use a combination of 2 x Coach Screws + 2 x Universal Wall Plugs for each fitting
  • Fixing into timber: Use a combination of 3 x Pozi Screws + 3 x Plastic Wall Plugs for each fitting
Fixings for a wall-to-floor handrail

Fixing feet: All our handrail kits use type 62 flanges for feet. Here are the fixings (not included with the kits) you would need to install these rails:

  • Fixing type 62 fittings into timber: Use 2 x Coach Screws for each fitting
  • Fixing type 62 fittings into concrete: Use 2 x Sleeve Anchors for each fitting
  • Fixing type 62 fittings into brick: Use 2 x Sleeve Anchors for each fitting

Fixings for walls: Our wall-to-floor handrail kits use a type C58 fitting to fix into walls. Here are the fixings (not included with the kits) you would need for these:

  • Fixing into concrete: Use a combination of 2 x Coach Screws + 2 x Universal Wall Plugs for each fitting
  • Fixing into brick: Use a combination of 2 x Coach Screws + 2 x Universal Wall Plugs for each fitting
Categories
Articles

Kee Klamp® Key Clamp Fittings

Kee Klamp® Key Clamp Fittings

Versatile Galvanised Solutions for Handrails, Safety Barriers, and Guardrails

When it comes to constructing robust structures like handrails, safety barriers, and guardrails, you need a solution that’s both reliable and flexible.

Kee Klamp® Fittings is a time-tested marvel that has proven its worth in countless projects worldwide over the past 80 years. In this article, we’ll delve into the world of Kee Klamp® Fittings, exploring their features, benefits, and why they stand out in the construction industry. 

The Essence of Kee Klamp® Fittings

At its core, the Kee Klamp® Fittings system is elegantly simple yet remarkably effective. It seamlessly joins standard sizes of structural steel tubes, ranging from 17.5mm O/D to 60.3mm O/D, into virtually any configuration you can imagine. With the broadest range of fittings available today, Kee Klamp® empowers you to bring your structural visions to life. 

Built to Last

Quality is paramount in construction, and Kee Klamp® Fittings adheres to the highest standards. These iron castings are manufactured to meet the stringent requirements of BS EN 1562 & BS EN 1563, ensuring durability and reliability.

Each fitting can support an impressive axial load of 900 Kg, with a safety factor 2:1, providing peace of mind in even the most demanding applications. Moreover, the main fittings hold a prestigious TÜV certification, underscoring their strength, manufacturing quality, and consistency.

Ease of Installation

One of the standout features of Kee Klamp® Fittings is their commitment to simplicity. They are designed with ease of installation in mind, eliminating the need for welding or fabrication. This saves you time and reduces the hassle and cost associated with hot work permits, threading, or bolting.

With Kee Klamp® Fittings, construction becomes a smoother, more cost-effective process.

The Versatility of Kee Klamp®

When it comes to constructing barriers, handrails, and guardrails, flexibility is key. Kee Klamp® Fittings offer precisely that. With components that effortlessly adapt to on-site variations, you can confidently tackle diverse construction challenges.

No longer will you require specialist labour or a toolbox filled with unique tools. Kee Klamp® simplifies the construction process, making it accessible to a wider range of professionals.

Key Clamp Versus Kee Klamp®: Unveiling the Differences

Now that we’ve explored the essence of Kee Klamp® Fittings, let’s draw a clear distinction between Key Clamp and Kee Klamp®. While both play pivotal roles in construction, not all clamps are created equal.

The Birth of Key Clamp

Key Clamp, a modular handrail system, emerged in the mid-20th century as a cost-effective solution for various construction projects. However, it wasn’t until 1934 that the Kee Klamp® Key Clamp solution was born. Conceived by George H. Gascoigne and his team, this innovative tube clamp answered the need for hygienic stalls for cows in dairy production, revolutionizing the construction industry.

Kee Klamp®: The Original and the Best

Today, over 85 years later, Kee Klamp® remains the true original clamp. While many imitations exist in the market, Kee Klamp® stands head and shoulders above the rest. It has undergone the most rigorous testing, adheres to the highest compliance standards, and boasts a rich history of enhancing British infrastructure.

The Kee Klamp® Advantage

Kee Klamp® isn’t just a clamp; it’s a symbol of excellence in construction. Here’s why it outshines the competition:

  1. Rigorous Testing: Kee Klamp® exceeds industry testing standards, ensuring unmatched durability and reliability.
  2. Corrosion Protection: Galvanised cast iron construction to BS EN ISO 1461 guarantees longevity.
  3. TÜV Certification: A mark of strength, manufacturing quality, and consistency.
  4. Load Capacity: Meets specified loadings up to 1500 N/m, providing robust support.
  5. Easy Installation: No welding, threading, or special tools required.
  6. On-Site Adaptability: A flexible system that accommodates variations effortlessly.
  7. Cost-Effective: Reduced installation costs and no need for specialist labour.

Putting Safety First

Safety is paramount in construction. Kee Klamp®’s 2:1 safety factor sets it apart, ensuring peace of mind for builders and end-users alike. With its history of dependable performance, Kee Klamp® remains the preferred choice for those who value both safety and quality.

Discover the Power of Kee Klamp® with SelectFIT

As you venture into the construction world, remember that not all Key Clamp fittings are created equal. From fittings for your light-weight structures to corrosion-resistant Kee Klamp®, these fittings designed with accessibility in mind, we offer a comprehensive range of products.

With a local inventory and quick order fulfillment, and convenient services like same-day SelectFIT is your premier source for Kee Klamp® tubular fittings and safety products.
When it comes to quality and reliability, choose the original – choose Kee Klamp®.

Conclusion

In the realm of construction, Kee Klamp® Fittings shine as a versatile, reliable, and safety-oriented solution. With a rich history and a commitment to excellence, Kee Klamp® stands as the gold standard in the industry. When it’s time to build, choose Kee Klamp® for strength, durability, and peace of mind. 

Categories
Articles

DIY easy-to-build greenhouse structure

DIY easy to build greenhouse structure

The article is used with permission from Simplified Building UK
https://simplifiedbuilding.co.uk/projects/diy-easy-to-build-greenhouse-structure

Retired contractor Robert built this greenhouse for his vegetables using Kee Klamp and sent us the photos. Galvanised fittings and tubes are resistant to rust; therefore they make the perfect material to use for outdoor structures.

How to build your own greenhouse

Step 1. Come up with a design.

There are no standard solutions when it comes to Kee Klamp: any structure is possible, under any configuration and dimensions.

Robert decided to go for a rectangular greenhouse which uses a total of 8 anchoring points (uprights).

If you want to go for a similar structure, you need to make sure that you properly anchor it to the ground. You might need to set the uprights into concrete, which is what Robert did with his greenhouse. Concrete needs to be poured into 300ml cubic shapes, one for each upright. This will give your structure stability.

The roof will also need enough slope, so that water is not trapped onto the roof material.

Step 2. Measure the area.

You now need to measure the area you want to build your greenhouse on. This will give you an idea of how much tube you should order.

Robert’s greenhouse is around 5.5m long, 3m wide and 2m tall.

Step 3. Determine what fittings you need.

For a sturdy structure, we recommend you use size 7 or size 8 tube and fittings.

Here is a list of fittings you might want to use:

For the corners of your greenhouse:

For the middle structure of your greenhouse:

Robert used bent tube to construct the roof, but you can easily create the bend without having to reshape the tube by using 55-7 (Obtuse Angle Elbow) or 55A-7 (Variable Elbow) fittings:

You can also use flanges at the bottom of each upright to anchor these to a solid surface (such as concrete).

However, as Robert needed to fix the greenhouse into soil, he had to pour concrete blocks into the ground.

Whichever your choice, just make sure that you do anchor the structure into the ground properly, as the wind might make it very unstable otherwise.

Step 4. Order the tube fittings.

You can order all materials on our website.

Step 5. Add your greenhouse cover and start planting!

Once you put everything together, it is time to find a suitable cover for your greenhouse. Attach it to the structure and start enjoying your greenhouse.

Categories
Articles

Industrial office design: Tables, shelving, screens and rails

Industrial office design: Tables, shelving, screens and rails

Esquire used Kee Klamp and galvanised tube to create bespoke, urban furniture for their Japan office. By combining fittings and pipe, they put together table and shelving frames, grab rails and office screens. There was no need for welding and everything was installed quickly, using simple hex keys. The wood for the table tops and shelves was sourced separately.

Table frames

You can use fittings and tube to build frames for any type of table tops – from wooden tops to even concrete and granite. Esquire used a bespoke frame that allowed the wooden top to be attached to the clamps. This particular frame included a 70-7 fitting to lift the desktop off the pipe frame and give it a ‘floating’ effect.

Shelving and storage unit frames

Esquire Japan used tube and fittings to build frames for several bookshelves and file storage units. The bookcases used the galvanised steel structures that attached to both walls and the floor for increased stability. The storage units used a freestanding steel frame with the wooden shelves resting on it.

Office dividers

A large, open space office usually requires a good layout and creative barriers to break up the space. Esquire went for freestanding steel frames to build barriers that would separate various areas of the office without making it look too cluttered.

How can we help?

Whether you are designing for the office or the home, Kee Klamp fittings can be used to create structures without the need for huge costs and extraordinary methods. Our team can help with quoting at no added cost. If you’re looking for more inspiration, be sure to scroll through our blog page.

Quote Form

Top 10 Safety Tips for Working on Heights